Get started
Tutorials

Add Mountaya to your MapLibre map

Add Mountaya to your MapLibre map

Your app already draws a MapLibre GL JS map. In this tutorial it gets Mountaya's outdoor base map, 3D relief, and the hillshade overlay, with a button to switch it on and off.
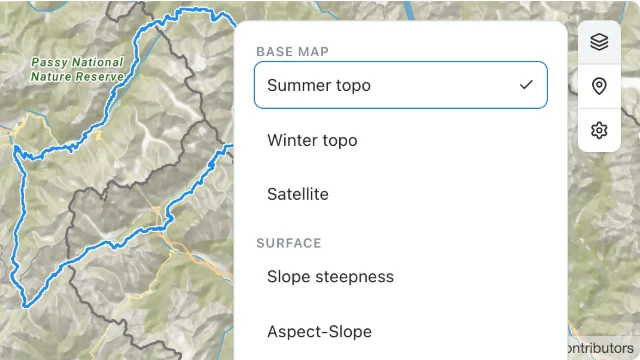
A MapLibre map with Mountaya's topographic base map and its layers panel

You need a publishable key with the tiles scope, from Organization → API keys in the Mountaya app. The Tile API comes with an agreement, which also lists the overlays your organization may draw.

No MapLibre app yet? Start one:

npx create-vite@latest my-map --template vanilla && cd my-map && npm install maplibre-gl@6.16.0

1

See what your key can draw

The layer catalog lists the base maps, the elevation source, and the overlays your organization may draw.

curl -s https://tiles.mountaya.com/v1/tile-layers \
  -H "X-API-Key: $MOUNTAYA_PUBLISHABLE_KEY" \
  | jq '{terrains: [.data.terrains[] | {slug, style: .variants.light.style.url}], elevation: .data.elevation.url, overlays: [.data.overlays[] | .children[]?.slug]}'
Response
{
  "terrains": [
    {
      "slug": "topo",
      "style": "https://tiles.mountaya.com/v1/terrains/topo/light/style"
    },
    {
      "slug": "winter",
      "style": "https://tiles.mountaya.com/v1/terrains/winter/light/style"
    },
    {
      "slug": "satellite",
      "style": "https://tiles.mountaya.com/v1/terrains/satellite/light/style"
    }
  ],
  "elevation": "https://tiles.mountaya.com/v1/elevation/tiles.json",
  "overlays": [
    "pois",
    "hillshade"
  ]
}

Overlays come in groups. Your organization's list may hold more, such as steepness or the weather forecasts.

2

Switch the base map

Point your map's style at a Mountaya terrain, and add your key to every request the map makes to the Tile API. The map fetches its tiles, icons and fonts on its own and cannot send headers, so the key rides in each address instead.

import * as maplibregl from "maplibre-gl";
import "maplibre-gl/dist/maplibre-gl.css";

const KEY = "pk_your_publishable_key";

// Adds your key to an address on the Tile API, once, and leaves every other address alone.
const withKey = (url) =>
  url.startsWith("https://tiles.mountaya.com/") && !url.includes("publishable_key=")
    ? `${url}${url.includes("?") ? "&" : "?"}publishable_key=${KEY}`
    : url;

const map = new maplibregl.Map({
  container: "map",
  style: withKey("https://tiles.mountaya.com/v1/terrains/topo/light/style"),
  center: [6.8712, 45.9231],
  zoom: 12,
  pitch: 55,
  transformRequest: (url) => ({ url: withKey(url) }),
});

Keep your own options as they are: only style and transformRequest change.

3

Add 3D relief

Once the style has loaded, add the elevation source from the catalog and drape the map over it.

map.on("load", () => {
  map.addSource("mountaya-elevation", {
    type: "raster-dem",
    url: withKey("https://tiles.mountaya.com/v1/elevation/tiles.json"),
    tileSize: 512,
  });
  map.setTerrain({ source: "mountaya-elevation", exaggeration: 1.2 });
});

Leave this step out for a flat map.

4

Draw an overlay

Each overlay has a specification: the sources and layers to add, styled already. Fetch it with your key, then add what it lists.

async function addOverlay(slug) {
  const response = await fetch(`https://tiles.mountaya.com/v1/overlays/${slug}/specification`, {
    headers: { "X-API-Key": KEY },
  });
  const { data } = await response.json();
  const layerIds = [];

  for (const source of data.sources) {
    map.addSource(source.id, {
      type: source.type,
      tiles: source.tiles.map(withKey),
      minzoom: source.zoom_min,
      maxzoom: source.zoom_max,
      attribution: source.attribution,
      ...(source.size ? { tileSize: source.size } : {}),
    });

    for (const layer of source.layers) {
      map.addLayer({
        id: layer.id,
        type: layer.type,
        source: source.id,
        ...(layer.source_layer ? { "source-layer": layer.source_layer } : {}),
        ...(layer.filter ? { filter: layer.filter } : {}),
        minzoom: layer.zoom_min,
        maxzoom: layer.zoom_max,
        paint: layer.paint ?? {},
        layout: layer.layout ?? {},
      });
      layerIds.push(layer.id);
    }
  }

  return layerIds;
}

Call it once the style has loaded, as the next step does. Hillshade is a raster-dem source with one hillshade layer, drawn from zoom 8 up.

5

Let readers switch it off

Draw the overlay once the style has loaded. Its layers are ordinary layers, so a button toggles their visibility.

const button = document.querySelector("#hillshade-toggle");

map.on("load", async () => {
  const layerIds = await addOverlay("hillshade");
  let visible = true;

  button.addEventListener("click", () => {
    visible = !visible;
    for (const id of layerIds) {
      map.setLayoutProperty(id, "visibility", visible ? "visible" : "none");
    }
    button.textContent = visible ? "Hide hillshade" : "Show hillshade";
  });
});

Add <button id="hillshade-toggle">Hide hillshade</button> beside the map's container, as the whole page below does. Readers can then compare the map with and without relief shading.

The whole page

Both files, as the steps build them. Start the app with npm run dev.

index.html
<!doctype html>
<html lang="en">
  <head>
    <meta charset="UTF-8" />
    <meta name="viewport" content="width=device-width, initial-scale=1.0" />
    <title>Mountaya on MapLibre</title>
    <style>
      html,
      body,
      #map {
        height: 100%;
        margin: 0;
      }
      #hillshade-toggle {
        position: absolute;
        top: 12px;
        left: 12px;
        z-index: 1;
      }
    </style>
  </head>
  <body>
    <button id="hillshade-toggle" type="button">Hide hillshade</button>
    <div id="map"></div>
    <script type="module" src="/src/main.js"></script>
  </body>
</html>
src/main.js
import * as maplibregl from "maplibre-gl";
import "maplibre-gl/dist/maplibre-gl.css";

const KEY = "pk_your_publishable_key";

// Adds your key to an address on the Tile API, once, and leaves every other address alone.
const withKey = (url) =>
  url.startsWith("https://tiles.mountaya.com/") && !url.includes("publishable_key=")
    ? `${url}${url.includes("?") ? "&" : "?"}publishable_key=${KEY}`
    : url;

const map = new maplibregl.Map({
  container: "map",
  style: withKey("https://tiles.mountaya.com/v1/terrains/topo/light/style"),
  center: [6.8712, 45.9231],
  zoom: 12,
  pitch: 55,
  transformRequest: (url) => ({ url: withKey(url) }),
});
map.on("load", () => {
  map.addSource("mountaya-elevation", {
    type: "raster-dem",
    url: withKey("https://tiles.mountaya.com/v1/elevation/tiles.json"),
    tileSize: 512,
  });
  map.setTerrain({ source: "mountaya-elevation", exaggeration: 1.2 });
});
async function addOverlay(slug) {
  const response = await fetch(`https://tiles.mountaya.com/v1/overlays/${slug}/specification`, {
    headers: { "X-API-Key": KEY },
  });
  const { data } = await response.json();
  const layerIds = [];

  for (const source of data.sources) {
    map.addSource(source.id, {
      type: source.type,
      tiles: source.tiles.map(withKey),
      minzoom: source.zoom_min,
      maxzoom: source.zoom_max,
      attribution: source.attribution,
      ...(source.size ? { tileSize: source.size } : {}),
    });

    for (const layer of source.layers) {
      map.addLayer({
        id: layer.id,
        type: layer.type,
        source: source.id,
        ...(layer.source_layer ? { "source-layer": layer.source_layer } : {}),
        ...(layer.filter ? { filter: layer.filter } : {}),
        minzoom: layer.zoom_min,
        maxzoom: layer.zoom_max,
        paint: layer.paint ?? {},
        layout: layer.layout ?? {},
      });
      layerIds.push(layer.id);
    }
  }

  return layerIds;
}
const button = document.querySelector("#hillshade-toggle");

map.on("load", async () => {
  const layerIds = await addOverlay("hillshade");
  let visible = true;

  button.addEventListener("click", () => {
    visible = !visible;
    for (const id of layerIds) {
      map.setLayoutProperty(id, "visibility", visible ? "visible" : "none");
    }
    button.textContent = visible ? "Hide hillshade" : "Show hillshade";
  });
});

Next steps

Last updated